Showing posts with label Arts and Crafts. Show all posts

Thanksgiving Activity

We had a great Thanksgiving activity yesterday.  We started out by making a gratitude board.  The girls all said things they were grateful for and we wrote them on the board.  Without any coaching, the majority of it was filled with the normal things we say we are thankful for, i.e., family, technology, love, etc.

Once they ran out of things to say, we showed them this short video-

The girls were silent as they watched.   It is a very touching video that pulls on your heart strings.  Once it ended needed we went back to the board and tried to fill it up even more.  This time the things they were thankful for came faster than I could write!  Clean water, shoes, beds, washer and dryer, Heavenly Father, Jesus Christ, shoes, heat, A/C and more!

We also showed them this video but it was a little too long and the younger girls lost interest.  It might work well for an older or smaller group.


Here is our finished board-


We spent the remainder of the time making thankful books.  Each girl got three brown paper bags then folded them in half.  We cut small slits (you could also use a hole punch) then fed twine or ribbon through to hold it in place.  The girls then had free reign to decorate it any way they wanted.  They all left with the challenge to write things they are thankful for each day between the activity and Thanksgiving.

Here are some of the books they made.


4th of July Tie Dye Shirts

In our little town, the Fourth of July is a big deal, so when we told the girls we would be making red, white and blue tie dye shirts, they were very excited!

Very little preparation was involved other than purchasing: red and blue dye, white t-shirts and rubberbands.  We did the activity outside on the lawn on a dollar store table cloth.

The girls simply created their design with the use of rubberbands then used the dye to create colors.  We put each shirt in a plastic grocery bag so they could take them home and let them sit.  We also gave them strict instructions to let them rest overnight, then to wash them alone.


The idea for this activity originally came from I Love to Create Blog, so this photo is from that site.  We used a different technique, but I wanted to give proper photo credit.


Since this activity didn't take too long, we also played some water balloon volleyball.

We used sheets folded into squares then volleyed waterballoons back and forth.  So simple!  No net necessary.  Plus, it provided lots of laughter! And teamwork ;)

Baby Blanket Service Activity

The mom of a little gal in our group is expecting a new baby.  We decided it was the perfect opportunity to pull out the sewing machine and quilting stands to make some burp rags and blankets.  The girls loved it!  They loved it so much that we repeated it again for our next activity.

We have a large group so we split the girls into two groups.  One group learned how to quilt with my partner and I worked on sewing with the other group.  We made some very basic burp rags out of flannel fabric cut into rectangles.  The girls each had an oppurtinuty to sew a few seams, do some ironing, take stitches out to fix mistakes and learn a few sewing basics.


The quilting part of the quilt was completed on the first week so my partner taught them how to bind the edges at the second activity.

It was impressive to see how quickly the girls caught on.  They had a great time!  This activity also provided an opportunity to serve a less-active family.  You could also make blankets and/or rags to donate to local shelters or hospitals.

Here are a few helpful resources to help with the activity-

Simple burp rag tutorial

If you don't have quit stands or are not familiar with quilting, consider a more simple approach.  I love this easy to follow video:


Here's another:


You could also add bibs to the activity!  Does it get any easier than making them out of place mats?


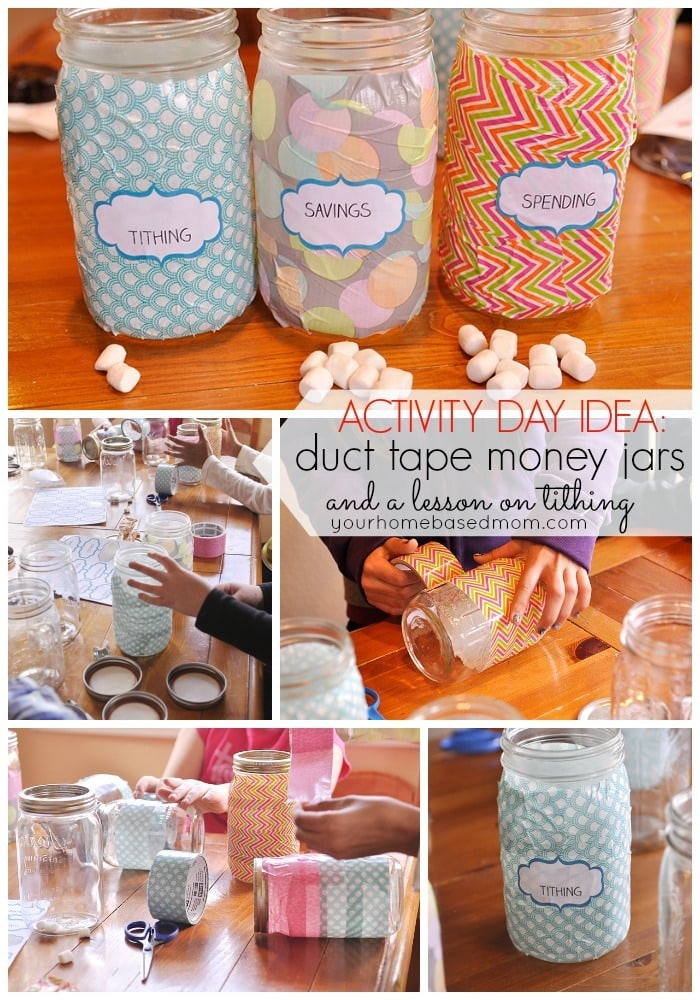
Duct Tape Jars and Tithing


This amazing idea is from Leigh Anne over at your homebased mom.  Not only is she one of my favorite bloggers, but she is an AD leader!  So we can reap the genius of her great ideas with the wonders of the internet!  Hop on over to the link above for this great idea.  And while you're there, you might want to stay awhile and browse her other fabulous, fun, pretty, and delicious ideas!  Seriously, I have loved every recipe I have tried from Leigh Anne.  Thanks for graciously letting us "borrow" this, Leigh Anne!  

True Symbols of Christmas


Here is an idea sent in from one of our readers.  Thanks so much for sharing!  

"I wanted to teach the girls the true symbols of Christmas in the context of an advent calendar. Having twelve girls (and they all come, yeah!) I need to be economical with supplies, so using my geometry compass I cut 7 1/2in circles out of cardboard cereal boxes. Then cut a 4in hole in the center of each to make a wreath.


These I painted green, giving a second coat to the colorful cereal box side.


Once dry I glued on 2" x 2" coin envelopes that I purchased on-line ($6.75 per 100).


I let the girls cut and paste the symbols onto the envelopes (just some clip art I found, I was able to fit three sets on one page) then they cut and inserted a quick blurb on each symbol along with one or two scriptures to read that day. I could only fit nine envelopes per wreath even though I had ten symbols to work with. I left out the wreath symbol but kept the info about it on the paper so they could still have it, perhaps they can glue it to the back since the whole thing is a wreath? Last of all they used my hole punch so they could attach a ribbon and hang up their project. Those who wanted wrote the nine days leading up to Christmas so they could remember which envelop to open each day.


Thanks for sharing, Laura!  I realize this is after the fact, but hopefully it will help out some of you for next year!  Or, you could adapt it for other holidays/projects.  


Secret Sisters

One of the best activities we did this past year was Secret Sisters.  We asked our Relief Society President for the names of some sisters who could use an adopted granddaughter, and each girl was assigned one as her older "sister".  We started off the relationship by making a simple card and dipping a caramel apple for them.  The apples were super easy!  Just follow the instructions on the back of the Kraft caramel bag!  And then to jazz it up a little, and give it the seasonal touch, we dipped it in white chocolate and added some fall sprinkles.

Add a little cellophane bag and some ribbon, and you have a little party on a stick.  I delivered these the next day, so the girls could be "secret" for the duration of the project.  

For phase two, we had the girls make these little cuties at the same activity:


It's just a dressed up roll of toilet paper!  Take a sheet of orange tissue paper, tuck and wrap it around the roll.  Tuck a little piece of green tissue in the top along with a smidge of raffia.  Cut out a jack-o-lantern face from sticky back black felt and PRESTO!  A cute Halloween decor item, and an emergency roll of toilet paper in one!  We delivered these on a different day.

For phase three, we made wreaths similar to this one:

You can find the tutorial HERE.  This was a separate activity night.  It does take a while, and I would suggest having all the fabric cut ahead of time.  We had the girls bring their fabric and we were really pushed to finish them.  These were also delivered secretly.

For the last phase of the project, we had an after church munch and mingle with our secret sisters.  Each girl met her sister and visited with her.  We just had some simple refreshments and played a little icebreaker game.  It was really rewarding for the girls to develop this relationship over a few weeks and be excited to serve someone.  They love to see each other now!  You can use this activity to incorporate several different requirements, and adapt it for the needs of your own group.  I would highly recommend it because it really opened the girls eyes to the lives of others outside their own age group.  


FHE lesson

This activity is super quick and easy...seriously.  We are having a lesson tonight on a recent talk by the prophet.  I chose the Race of Life from the April session of conference this year.  I am going to share with them the main points of Pres. Monson's talk-the plan of salvation, enduring to the end.  Then we will put together our own file folder for family night.  I printed off a lesson plan which can be found here.  I will have the girls draw their own diagram of the PofS and also jot down any other ideas they have that would specifically work for their family.   The rest of the time we will spend making this super simple ornament
found here
image from http://pinterest.com/pin/143481938099107665/

I am making it even easier for the girls by pre-cutting the red paper, cutting a black belt out of sticky-back felt, and using a tiny piece of gold pipe cleaner for the buckle on the belt.  We have 14-16 girls, so it has to be super simple and self-explanatory or we don't get finished in time.  I will post a pic of a finished one later. Have fun!

Tami

Springtime Fun and Games

image from makeit-loveit.com
We decided to do a quick craft and a review of the Articles of Faith before spring break.  So, my trusty co-leader found this great craft at make it -love it that would be quick and simple.  Basically all you need are paper towels, food coloring, water, and chenille stems. You fold the paper towel in half, four times.  This makes 16 sections, unfolded.  Then you dip a corner into four different colors of dye.  Repeat with each corner.  Unfold and let dry.  Then fold it accordion style, pinch in middle and twist a chenille stem around it to create the antennae.  Super cute and easy!

We also tied in a springy review of the A of F by doing an easter egg hunt.  I found this great idea here at a bushel and a peck.
image from http://i12.photobucket.com/albums/a214/lilsprinter07/easter_basket_300x193.jpg
BTW, this is a fabulous site with some super cute ideas and printables!  I don't know how she has time to do all that designing and creating, but I love it all!  We filled a whole bunch of eggs with candy and half of them also had cut up sections of Articles of Faith in them.  I chose to just do 8-13, since that is what we needed to review.  You can pick and choose, or do all of them!  While Sister S. was working with half the girls on the craft, I reviewed the A of F verbally with the other half.  Then we switched.  I went outside and hid the eggs about 5 minutes before everyone was finished.  We let them loose to find the eggs and then they got to eat their candy and try to find the rest of the pieces of their Article of Faith.  It was fun and made them think hard about the individual phrases of the Article of Faith.  We finished with a spring cookie treat and a robust game of tag!  Thank goodness it is getting warm!  12-15 girls in my living room is a little nuts!  Enjoy!

Tami

Just for Fun!

from tipjunkie.com
This past activity day, we decided to do something fun--sort of under the developing talents heading.  We have worked on a lot of requirements so far so this was a craft night.  We did three crafts-two of which were edible!  :)  The girls made their own refreshments, which was fun for them and nice for us.
The first one we did was this cute doughnut snowman (above) that I found on tipjunkie.  It is super easy-you just need powdered mini-doughnuts, peanut m&ms, mini chocolate chips, and sour punch straws.  You can thread them on a lollipop stick or a skewer.  One thing the other leader noted, was that if the doughnuts are too dry, they will crumble when you skewer them.  So if you can track down some reasonably fresh ones, like from a grocery store bakery, they will work better than the hostess ones.

from http://pinterest.com/source/a6.sphotos.ak.fbcdn.net/

Our second food craft was these edible roses.  Of course, it was February, and I don't think there were any kiwis to be had!  So we just used grapes and strawberries and fruit skewers.  They were pretty and yummy,  and in hindsight, this is probably better to do during the summer when fruit is cheaper and more plentiful!  :)


The other craft we did was making our own fabric flowers, which I then glued onto headbands.
from lilblueboo.com
I found this great tutorial on lilblueboo which has all kinds of cute and crafty things!  (And also, the author is an amazing lady who is fighting cancer and still manages to do all this cute stuff!  She has a great attitude and if you have time, I recommend checking her blog out!)  The best thing about this is that it is a no-sew flower.  However, it is still a little tricky for the girls to do all on their own, and since we have 15 girls, it took more time than I thought it would.  We did divide into two groups, with one group doing the fruit with the other leader, and one group doing the flowers with me.  Also, in hindsight, I would have cute my fabric strips ahead of time and THEN let the girls choose what color they wanted, instead of the other way around.  We only did one flower because of the time factor, but the headbands still turned out really cute.  The supplies you need are  2" wide strips of fabric, pipe cleaners (chenille stems), fabri-tac glue, and some mini-clothespins or straight pins to hold the flower together while the glue is drying.  Also, a hot glue gun and headbands to glue the flower onto.

Have fun!  And don't burn your fingers on the hot glue gun!  Like I did.  About 10 times.  :)

Tami


Project Valentine


Are you looking for a fun service project for your AD Girls? I have got a fun one for you! Project Valentine makes life a "little sweeter" for individuals undergoing cancer treatment. They distribute donated items for hundreds of gift bags. These gift bags are lovingly assembled and hand-delivered each year to men, women and children undergoing cancer treatment on or around Valentine's Day. Would you like to get involved? How about having a craft day with your Activity Day girls and making and donating something fun! Go HERE for information on how you can help.

Kristen

Once There Was a Snowman, Snowman, Snowman!

Where we live we rarely get snow. When we do, they cancel school, and everyone has a snowman in their front yard! By afternoon all the snow melts and all that is left is the snowman for a few days. I thought it would be fun to make some cute snowmen that could hang around a little longer!

These were a few I made in December with my own children. You can go HERE for directions on how to make them. I bought socks at Target for $1 and used buttons and twine I already had. To make our noses we clipped real twigs from our trees and painted them orange with acrylic paint.

Happy Crafting!

Kristen

Thanksgiving Tree.........

Yesterday we did a really fun activity that the girls loved!
We made thankful trees! It was so much fun! I printed them off here!

http://www.sundayschoolkids.com/activities-thanksgiving-tree-instru.htm

I printed them off on cardstock! with leaves of different colors! and we
talked about "gratitude" and being thankful! I based it on President Monsons talk in
General Conference on "GRATITUDE"! the girls loved listing the things they were thankful for! and then we made chocolate pilgram hats- that were shown in my last blog post! the girls had a blast!

Holidays are coming!


(Great Thanksgiving Cookie Idea- cookies with Chocolate Covered Marshmallows & Yellow Icing- Yum and SO EASY! )

I can't believe how fast the holidays are upon us! We all know how busy life can be and we all need ideas that can be implemented and fast. Especially as a Activity Day leader we need to have ideas ready and handy and Im going to let you in on a little secret of mine- Okay its not really a secret but it is my favorite place to get ideas for anything. Games, crafts, printables you name it they have it. It is http://familyfun.go.com
okay the secret is out- Now im sure that this site is where you all find your ideas but if not then I really did let you in on a little secret- They have so many cute ideas, crafts, and so much more. So since it is the season for being Thankful, I think I will focus on that this Activity Day month- Here is a few pictures of Thanksgiving Ideas this month.......


Okay so I have been saving my (Toilet Paper rolls) with the hopes that I could somehow find a great craft to use them with the girls with well now I found it- It is a great idea! You could use them for any kind of character. You could make some scripture people from the Book of Mormon, Or santa and his reindeer.

Great TEEPEE's made of Icing and Cones.

"I am thankful for: "
I love this print out you can go to their website and print it off if you would like. Just another Idea. It is six different cards that you can write on. It would be perfect to let the girls write their favorite things that they are thankful for.

Halloween Ideas

I love ORIENTAL TRADING.com they have the cutest and funnest ideas for parties and holiday kits! Great for any holiday, and some of them are really inexpensive if you plan ahead. The girls had a ball making these little ghosts.


Here is the old popcorn hand that most everyone knows how to make but if you add red food coloring to the mix or make carmel popcorn and add red food coloring you have red popcorn- Then you can attach a note that says
"YOU'VE BEEN CAUGHT RED HANDED SERVING OTHERS" . (or being good, or going the extra mile, etc. etc) and give to any bishopric, primary presidency, or anyone you want to spotlight.


"GREAT IDEA FOR FAMILY HOME EVENING"
You have been BOO"D is a popular thing to do in most neighborhoods during the Halloween holiday. The one that I had the girls do is located at :

http://strongarmor.blogspot.com/search/label/Halloween

You can download and copy and print at this blog site. Great ideas! Love it!

We did the "Halloween Phantom" it was so much fun! The girls made goodie bags
and we copies off two ghosts and two papers to go with it- and the girls picked 2 families that they wanted to Boo- They knocked and ran and left their goodies by the door from the Halloween phantom! Great thing they could do for FHE!

Firework Pens


What a fun way to celebrate the Fourth of July.  How about a lesson on freedom and then making these super easy and cheap pens.

I know I have seen the garland at the Dollar Store.  Pick up a pack of pens and a few strands of garland and for a few bucks you have a fun activity!

Portable Flower Pots

In a few weeks we plan on doing an activity about self-reliance and gardening.  We've instructed the girls to come up with a 2 liter pop bottle and bring it to the activity so we can do something similar to this.  (More to come about this after this activity is complete!)
 
And this morning when I saw Pioneer Woman's Blast from the Past post, I thought this would make a treat to serve at the end!
 (Photo from Pioneer Woman)

You could also do dirt and worms if you don't want to get too fancy.
(Photo from Kraft Foods)

FHE in a Can....DONE!

Today we did the FHE in a can activity.  It was a huge hit with the girls and a total success.  Here's the run-down:


We purchased enough cans and lids for all of our girls (80 cents per can and 21 cents per lid).
We also rented a canner
Using this great site, I found a lesson that was perfect for my girls, Being an Example.

We gave the FHE lesson to the girls and played a few rounds of Draw or Drama.  After that we helped them assemble the cans.  Here was was included:

FHE Plan
Copy of FHE Game

Copy of FHE Story
Cake Mix
M&M's


Each girl folded up their papers and placed them in the can.  For the treat, we chose to do cake cookies.  We included the mix and 1 cup of M&M's.  It's really just what we had on hand, but the possibilities are endless!  You could do plain cake mixes, s'mores, many different varieties of cookies, candy bars, etc.  Depending on the time of year, you can get smoking deals on cake mixes, brownie mixes, s'mores stuff and lots more.  

If you choose to do this FHE lesson, be sure to tell your girls that after they cut the strips up, to use the can to play out of.
 
The girls loved watching their cans being sealed as well.  If you aren't able to get your hands on a canner you could try using paint cans that can be purchased at Home Depot or Lowes or even using the cans and just buying the white plastic lids.

Family Home Evening in a Can

If you can get your hands on a canner from the cannery, this would be a great idea! Of course you could do it without a canner, just use a small bucket or paint can. Help your girls come up with a lesson idea after including everything you need, seal it! They could even decorate it the can if you have time so that it can be counted towards Arts and Crafts.

From the website:
Inside the can, try to put everything the family needs to hold a family home evening. A lesson could be in any form: a story, games or puzzles from church magazines, or numbered cards to be passed out and read in order. These can be done using scriptures, hymns, and quotes from church magazines. These could be put in a decorated envelope. Also include the ingredients to make a simple treat. This could be purchased mixes for cookies, brownies, cakes, or drinks. Make-it-yourself mix recipes are also available and could be packaged in fun fabric or paper bags. A simple craft could also be included with the supplies in a Ziplock bag. If room allows, include napkins, handouts, and anything else you would like.

I think we might add this to our list of activities to do!

Baking, Ornaments and Secret Santa

My girls requested (begged might be a better word) to do Secret Santa for a few families this year. We chose to do a family that is currently investigating the church, their Primary teacher and another Primary leader that they all love, the chorister. When they arrived I had everything laid out and ready to go. I laid it out in "stations" so that it was totally chaotic- although some chaos is to be expected!

We had a number of things planned to make but because of time didn't get to do them all. We split the girls in two teams so one half could help bake and the other could work on their craft.

The first baking half made these: (keep in mind while looking at them that the girls did these all on their own!)
Chocolate Covered Peanut Butter Ritz Crackers
(It wouldn't be right if I didn't give the credit to my Grandma for this one. She has been making them all my life.)
All you need is Ritz Crackers, peanut butter, melted baking chocolate and sprinkles.
One girl spread the peanut butter between to crackers, one dipped them in the chocolate (you could also do white chocolate) and one of the younger ones topped them with sprinkles.

Chocolate Chunk Cookies
Before they arrived I made these cookies out of a Betty Crocker mix. Of course, I would have liked to be homemade but it worked out just fine. We just used melted white coating, then one girl dipped half the cookie in and another sprinkled crushed candy canes on top.

The second group of girls helped make Cinnamon Milk. This stuff if so yummy! My mom's friend makes it for our family every year and I always look forward to it. So, thanks for the recipe Helen!

The girls helped measure out the ingredients, stir it up, fill the bags, tie them shut and add the instructions. We ended up adding 10 cups of milk, 5 cups of creamer and sugar and 2 1/2 tbs. of cinnamon. Then the girls scooped them into the clear party bags (we used a tea cup and each bag got 2 scoops) and tied them up. To add the instructions we just cut them out and taped them to the front. We were in too much of a hurry to get out the door so I didn't get a picture of the final product. We had enough for each of our Secret Santa families and for the girls each take one home. 12 bags total.

I wrote poems to attach to the goody plate just so that the person receiving them could know where they came from. (I know, it sort of defeats the purpose of the whole Secret Santa thing, but I would want to know!) The first poem is appropriate for teachers, bishops, etc. and the second was written for the investigator family. It is more generic and could really be used for anyone.

Besides doing Secret Santa gifts we also wanted the girls to have something to take home. My partner helped them make the cutest little snowman ornaments. She had everything cut and ready to go so all the girls had to do was assemble. She did great! It was so simple and they loved it. If I can find the instructions I will add the link.I know that I am adding this a little late in the month, but maybe this will help you plan for next year! And now that the holidays are winding down we will be going back to 2 one hour activities a month. We have lots of good ideas to share!

Modesty

This week I did these with my two little girls:(Keep in mind that they are 4 and 2!)

I traced their bodies onto butcher paper and then using scraps of fabric and craft supplies, they dressed their outline up. I thought it would make a great activity if you had a lesson on modesty and then had them create modest outfits.

We used pipe cleaners to make the necklace, pom poms for the bracelet, foam craft flowers, yarn and scrap fabric. Get creative and the possibilities are endless!
Related Posts with Thumbnails